Creating a Powerful .NET Microservice with a Dedicated Datastore on Gitpod
In the modern software world, microservices have emerged as a dominant pattern for building scalable, manageable, and resilient systems. A microservice, in essence, is a self-contained application unit that collaborates with other services to deliver a larger system functionality.
What makes a microservice really stand out is its dedicated datastore. Unlike monolithic systems where all services share a common database, each microservice in a microservices architecture owns its own database. This autonomy enhances resilience, scalability, and separation of concerns.
In this article, we will embark on a journey to create a .NET microservice using the latest .NET 7 SDK on Gitpod. This microservice will harness the power of an MSSQL database, all set up using Docker. Ready to dive in? Let’s get started!
Step 1: Install .NET SDK
Before diving into the code, we need to set up our environment. The first step is to install the .NET SDK (Software Development Kit), which provides all the necessary tools to build .NET apps.
Open your Gitpod terminal and run the following commands:
sudo apt-get update
sudo apt-get install -y dotnet-sdk-7.0
To ensure that dotnet tools are accessible from any directory, add them to the path variable:
cat << \EOF >> ~/.bash_profile
# Add .NET Core SDK tools
export PATH="$PATH:/home/gitpod/.dotnet/tools"
EOF
Reload your bash_profile to apply the changes:
source ~/.bash_profileStep 2: Set Up the MSSQL Docker Container
Docker makes it incredibly easy to run applications, including databases, in isolated containers. For our microservice, we will use a Microsoft SQL Server container from Docker Hub.
In your Gitpod terminal, execute the following (you may want to consider a docker system prune first):
docker pull mcr.microsoft.com/mssql/server
docker run -e 'ACCEPT_EULA=Y' -e 'SA_PASSWORD=MoreBetterPassword!23' -p 1433:1433 --name sql_container -d mcr.microsoft.com/mssql/server
Remember to replace MoreBetterPassword!23 with a strong password of your choice.
Step 3: Initialize Your .NET Microservice Project
Now that our environment is primed, let’s kickstart our .NET microservice:
dotnet new webapi -n MyMicroservice
cd MyMicroservice
Step 4: Integrate MSSQL with Your Microservice
In this step, we will establish a connection between our microservice and the MSSQL database.
First, install the necessary package:
dotnet add package Microsoft.EntityFrameworkCore.SqlServerNext, update the appsettings.json to include the connection string:
"ConnectionStrings": {
    "DefaultConnection": "Server=localhost;Database=MyDatabase;User Id=sa;Password=MoreBetterPassword!23;TrustServerCertificate=true;"
}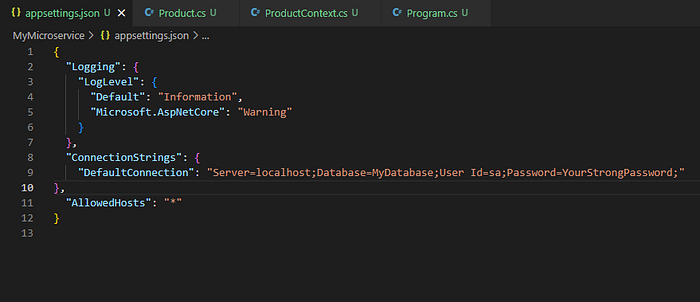
Again, make sure to replace YourStrongPassword with the password you set earlier.
Why a Dedicated Datastore?
Having a dedicated datastore for each microservice is pivotal for several reasons:
- Isolation: By segregating data, services are not directly dependent on each other. A failure in one service’s datastore doesn’t cripple others.
- Scalability: Individual microservices can be scaled independently, depending on their respective workloads.
- Flexibility: Since each microservice owns its data, it can select a datastore that best fits its needs, be it relational, NoSQL, or even a file system.
- Improved Development Speed: Teams can work independently on their services without being bogged down by shared database constraints.
Use Case: E-Commerce System
Imagine an e-commerce system comprising of services like User Management, Product Catalog, Order Management, etc. Each of these microservices would have its own dedicated database.
- User Management might use a relational database to store user profiles.
- Product Catalog might leverage a NoSQL database for better search and categorization capabilities.
- Order Management could use a relational database to maintain relationships between orders, products, and users.
This separation ensures that if the Product Catalog database faces issues, it won’t directly affect Order Management or User Management.
Conclusion
Building microservices with dedicated datastores offers unparalleled benefits in terms of scalability, resilience, and development speed. By harnessing the power of .NET 7 and Gitpod, we’ve seen how straightforward it is to get a microservice up and running with its own MSSQL database.
The journey doesn’t end here. As you dive deeper into the world of microservices, you’ll uncover more patterns, tools, and best practices that will empower you to build robust systems ready for the challenges of the modern web. Happy coding! 🚀
Addendum: Building a Real .NET Microservice with MSSQL Datastore
Transitioning from the initial setup, let’s delve into building a functional “Products” microservice. This service will interact with our MSSQL database, allowing us to manipulate product data seamlessly.
Step 5: Define the Product Model
Begin by crafting our Product model. Create a Product.cs file within a Models folder, and populate it with:
namespace MyMicroservice.Models
{
    public class Product
    {
        public int Id { get; set; }
        public string Name { get; set; }
        public decimal Price { get; set; }
        public string Description { get; set; }
    }
}
Step 6: Set Up the Database Context
The database context is our liaison with Entity Framework for a model. In the Models folder, establish a ProductContext.cs and input:
using Microsoft.EntityFrameworkCore;

namespace MyMicroservice.Models
{
    public class ProductContext : DbContext
    {
        public ProductContext(DbContextOptions<ProductContext> options) : base(options) { }
        public DbSet<Product> Products { get; set; }
    }
}
Step 7: Configure the Database Context in Program.cs
The Program.cs in .NET 7 is the gateway for application configuration.
- At the beginning of
Program.cs, append the required usages:
using MyMicroservice.Models;
using Microsoft.EntityFrameworkCore;
2. The rest of Program.cs should look exactly like this:
var builder = WebApplication.CreateBuilder(args);

// Add services to the container.
var connectionString = builder.Configuration.GetConnectionString("DefaultConnection");
builder.Services.AddDbContext<ProductContext>(options => options.UseSqlServer(connectionString));

builder.Services.AddControllers();
builder.Services.AddEndpointsApiExplorer();
builder.Services.AddSwaggerGen();

var app = builder.Build();

// Configure the HTTP request pipeline.
if (app.Environment.IsDevelopment())
{
    app.UseSwagger();
    app.UseSwaggerUI();
}

app.UseHttpsRedirection();
app.UseAuthorization();
app.MapControllers();
app.Run();
Step 8: Generate the Products Controller
To manage our CRUD operations, we’ll need a controller. Generate it with:
dotnet add package Microsoft.VisualStudio.Web.CodeGeneration.Design
dotnet add package Microsoft.EntityFrameworkCore.Design
dotnet add package Microsoft.EntityFrameworkCore.Tools
dotnet tool install --global dotnet-aspnet-codegenerator
dotnet aspnet-codegenerator controller -name ProductsController -async -api -m Product -dc ProductContext -outDir Controllers
This command scaffolds a controller that automates CRUD actions for the Product model.
Step 9: Launch the Microservice
Initiate the microservice with:
dotnet runTo interact with the service, head over to https://localhost:5001/Products. Tools like Postman or CURL are excellent for probing the API endpoints. Also, make sure to go to: https://localhost:5001/Swagger
In a new terminal, do this:
Based on the steps we’ve followed so far, the Products table has not been created yet. Entity Framework Core uses a concept called "Migrations" to manage and version the database schema. We haven't executed any migrations to update the database with the Product model.
Here’s how you can create and apply migrations:
a. Install the EF Core CLI tools:
dotnet tool install --global dotnet-efb. Create a migration: This will generate code that represents the changes to be made to the database.
dotnet ef migrations add InitialCreatec. Apply the migration to the database: This will update the database schema.
dotnet ef database updateHere’s a breakdown of the process:
dotnet ef migrations add InitialCreate: This command creates a migration (essentially a set of instructions) that, when applied, will create theProductstable. The migration itself doesn't update the database; it just creates a set of instructions to do so.dotnet ef database update: This command applies all pending migrations, effectively updating the database. If theInitialCreatemigration has instructions to create theProductstable (which it should, based on yourProductmodel andProductContext), then this command will create that table in the database.
After running these commands, the Products table should be created in the database. Remember, initially, there won't be any products in the database since we haven't added any. You'll have to use the POST endpoint (via tools like Postman or CURL) to add products or write some seed data code to populate the table on startup.
Step 10: Engage with the Database
To visualize our database data, the sqlcmd utility by Microsoft is your ally, or any SQL client compatible with MSSQL. Here's the sqlcmd way:
- Go in with:
docker exec -it sql_container bashOnce inside the container’s shell:
/opt/mssql-tools/bin/sqlcmd -S localhost -U sa -P 'MoreBetterPassword!23'- Execute SQL commands:
USE MyDatabase;
SELECT * FROM Products;
GO- To exit the SQL command line, use:
EXITIf you run into problems here, try this:
docker ps -aThis command will list all containers, including those that are stopped.
If the SQL Server container is stopped, you can start it with:
docker start sql_containerAfter starting the container, you should be able to connect to it using the docker exec command provided earlier.
If you continue to face issues, it might be helpful to check the logs of the container to diagnose any problems:
docker logs sql_containerThis command will show the logs for the SQL Server container, which may provide insights into why the container wasn’t running. (A common problem is that people absolutely refuse to change the password). I’m talking about you, aren’t I?
To fix this issue, you should remove the existing container and create a new one with a more complex password.
Here’s how to do it:
- Remove the existing container:
docker rm -f sql_container- Run a new SQL Server container with a more complex password:
docker run -e 'ACCEPT_EULA=Y' -e 'SA_PASSWORD=MoreBetterPassword!23' -p 1433:1433 --name sql_container -d mcr.microsoft.com/mssql/serverReplace MoreBetterPassword!23 with a strong password of your choice that meets the SQL Server password complexity rules.
After executing these commands, the SQL Server container should start without issues.

Go in with:
docker exec -it sql_container bashOnce inside the container’s shell:
/opt/mssql-tools/bin/sqlcmd -S localhost -U sa -P 'MoreBetterPassword!23'Conclusion of Addendum
Kudos! You’ve constructed a .NET microservice that liaises with an MSSQL database, marking a crucial step in your microservices journey. With this groundwork, you can extend this service, intertwine it with other systems, or deploy it to cloud platforms. As your architecture evolves, the principle of maintaining microservices autonomy ensures a robust, scalable structure. Forge ahead! 🚀
Seeding the Database and Managing Data
To flesh out the microservice, we’ll seed our database with some initial products and extend the microservice to manage these products efficiently.
Step 1: Seeding the Database
To seed our database, we’ll introduce some initial data into our ProductContext. This is usually done in the OnModelCreating method of the context.
- Update the
ProductContext.cs:
using Microsoft.EntityFrameworkCore;

namespace MyMicroservice.Models
{
    public class ProductContext : DbContext
    {
        public ProductContext(DbContextOptions<ProductContext> options) : base(options) { }

        public DbSet<Product> Products { get; set; }

        protected override void OnModelCreating(ModelBuilder modelBuilder)
        {
            modelBuilder.Entity<Product>().HasData(
                new Product { Id = 1, Name = "Laptop", Price = 999.99M, Description = "High-end gaming laptop" },
                new Product { Id = 2, Name = "Mouse", Price = 49.99M, Description = "Wireless mouse" },
                new Product { Id = 3, Name = "Keyboard", Price = 79.99M, Description = "Mechanical keyboard" }
            );
        }
    }
}
- Create a new migration to reflect this seeding:
- Install the Entity Framework Core tools:
dotnet tool install --global dotnet-ef- Add the installed tool’s path to your PATH environment variable:
export PATH="$PATH:/home/gitpod/.dotnet/tools"After you’ve done this, you should be able to run the dotnet ef commands as expected.
Then, proceed with your migration:
dotnet ef migrations add SeedDatabaseAnd apply it:
dotnet ef database updateStep 2: Expand the Products Controller
The scaffolded ProductsController provides the basic CRUD operations. However, for the sake of this tutorial, let's implement a few more methods to give a better understanding.
In ProductsController.cs, replace with:
using System;
using System.Collections.Generic;
using System.Linq;
using System.Threading.Tasks;
using Microsoft.AspNetCore.Http;
using Microsoft.AspNetCore.Mvc;
using Microsoft.EntityFrameworkCore;
using MyMicroservice.Models;

namespace MyMicroservice.Controllers
{
    [Route("api/[controller]")]
    [ApiController]
    public class ProductsController : ControllerBase
    {
        private readonly ProductContext _context;

        public ProductsController(ProductContext context)
        {
            _context = context;
        }

        // GET: api/Products
        [HttpGet]
        public async Task<ActionResult<IEnumerable<Product>>> GetProducts()
        {
            if (_context.Products == null)
            {
                return NotFound();
            }
            return await _context.Products.ToListAsync();
        }

        // GET: api/Products/5
        [HttpGet("{id}")]
        public async Task<ActionResult<Product>> GetProduct(int id)
        {
            if (_context.Products == null)
            {
                return NotFound();
            }
            var product = await _context.Products.FindAsync(id);

            if (product == null)
            {
                return NotFound();
            }

            return product;
        }

        // GET: api/Products/name/Laptop
        [HttpGet("name/{productName}")]
        public async Task<ActionResult<Product>> GetProductByName(string productName)
        {
            var product = await _context.Products.FirstOrDefaultAsync(p => p.Name == productName);

            if (product == null)
            {
                return NotFound();
            }

            return product;
        }

        // PUT: api/Products/5
        [HttpPut("{id}")]
        public async Task<IActionResult> PutProduct(int id, Product product)
        {
            if (id != product.Id)
            {
                return BadRequest();
            }

            _context.Entry(product).State = EntityState.Modified;

            try
            {
                await _context.SaveChangesAsync();
            }
            catch (DbUpdateConcurrencyException)
            {
                if (!ProductExists(id))
                {
                    return NotFound();
                }
                else
                {
                    throw;
                }
            }

            return NoContent();
        }

        // PATCH: api/Products/5/price/999.99
        [HttpPatch("{id}/price/{price}")]
        public async Task<IActionResult> UpdateProductPrice(int id, decimal price)
        {
            var product = await _context.Products.FindAsync(id);

            if (product == null)
            {
                return NotFound();
            }

            product.Price = price;
            await _context.SaveChangesAsync();

            return NoContent();
        }

        // POST: api/Products
        [HttpPost]
        public async Task<ActionResult<Product>> PostProduct(Product product)
        {
            if (_context.Products == null)
            {
                return Problem("Entity set 'ProductContext.Products' is null.");
            }
            _context.Products.Add(product);
            await _context.SaveChangesAsync();

            return CreatedAtAction("GetProduct", new { id = product.Id }, product);
        }

        // DELETE: api/Products/5
        [HttpDelete("{id}")]
        public async Task<IActionResult> DeleteProduct(int id)
        {
            if (_context.Products == null)
            {
                return NotFound();
            }
            var product = await _context.Products.FindAsync(id);
            if (product == null)
            {
                return NotFound();
            }

            _context.Products.Remove(product);
            await _context.SaveChangesAsync();

            return NoContent();
        }

        private bool ProductExists(int id)
        {
            return (_context.Products?.Any(e => e.Id == id)).GetValueOrDefault();
        }
    }
}
These methods augment our microservice to fetch products by name and update their prices.
Let’s walk through testing and validating the microservice.
Step 1: Launch the Microservice
Start your microservice using:
dotnet runOnce it’s running, it will be available at https://localhost:5001.
If you see this is in a state that says detecting then that means that gitpod is struggling to pull this up. If that is the case, go to the swagger URL on the port:
https://5128-fenago-dotnetmicroservi-lz1zgjou0zx.ws-us104.gitpod.io/swagger/index.html
(this will be your gitpod URL with the port in front)

Step 2: Use a Tool to Test Endpoints
You can use tools like Postman, Insomnia, or simply cURL from the command line to test the endpoints.
Testing using cURL:
- Fetch All Products (you may need to replace localhost:5001 with your gitpod address):
curl -X GET https://localhost:5001/Products- Retrieve a Single Product by ID (replace
{id}with an actual ID):
curl -X GET https://localhost:5001/Products/{id}- Retrieve a Single Product by Name (replace
{productName}with an actual product name):
curl -X GET https://localhost:5001/Products/name/{productName}- Update Product Price (replace
{id}and{newPrice}with actual values):
curl -X PATCH https://localhost:5001/Products/{id}/price/{newPrice}Testing using Postman:
- Open Postman.
- Set the method to
GET, and enterhttps://localhost:5001/Productsto fetch all products. Hit "Send". - To fetch a single product by ID, set the method to
GET, and enter the URLhttps://localhost:5001/Products/{id}, replacing{id}with an actual ID. - For retrieving a product by name, use the URL
https://localhost:5001/Products/name/{productName}, replacing{productName}with a product name. - To update the price of a product, select the
PATCHmethod and use the URLhttps://localhost:5001/Products/{id}/price/{newPrice}, replacing{id}and{newPrice}with actual values.
Step 3: Check Results
After each test, you should see a response in your tool (e.g., Postman or the terminal for cURL). The responses will provide information on the products or confirm the actions you’ve taken.
Step 4: Database Verification
For a deeper validation, you can also directly check the database to ensure that data is correctly added, updated, or retrieved. Use the sqlcmd utility or any SQL client compatible with MSSQL to inspect the Products table and its data.
Conclusion
Testing and validation are crucial steps in software development. Regularly testing your endpoints ensures that your microservice behaves as expected and allows you to catch and address issues early. Always ensure your tests cover various scenarios to guarantee the robustness of your service.
Conclusion of Addendum
With these additions, our microservice is now equipped to seed initial data into the database and manage products more comprehensively. This demonstrates the power and flexibility of ASP.NET Core in developing robust and scalable microservices. As you evolve your microservice architecture, always consider the individual responsibility of each service and how they interact. Happy coding! 🚀