How to Use Microsoft AutoGen to Assemble a Team of Robots for Writing a Book: Step by Step with Code Examples
Introduction
In the ever-evolving landscape of artificial intelligence, Microsoft’s AutoGen stands out as a promising use of GPT. It is a new era where AI transcends traditional boundaries, empowering us to automate complex tasks with unprecedented ease. Imagine harnessing this power to write a book — a symphony of words orchestrated by a team of AI agents. Instead of you dealing with 1 “ChatGPT” — what if you could create a team of GPTs to work together to solv any problem? (Don’t worry — there’s still a human in the middle)
What is AutoGen?
At its core, AutoGen is a cutting-edge framework designed to streamline the use of large language models (LLMs) like GPT-4. It facilitates the creation of customizable and conversable agents, enabling developers to automate intricate workflows without extensive coding1.
Setting Up Your Team
Content Director (This is an AI Robot)
This agent is the visionary, ensuring that the book’s narrative flows seamlessly from one chapter to the next. It maintains the integrity of the plot and keeps the thematic elements consistent throughout the manuscript.
Writer (This is an AI Robot)
Our Writer agent is the storyteller, spinning the yarn under the Content Director’s guidance. It generates the content, chapter by chapter, infusing creativity and coherence into every paragraph.
You (The Supervisor)
You are the maestro, fine-tuning the symphony that is your book. Your insights, critiques, and creative flair guide the AI agents, refining the narrative and steering the project towards excellence.
Step-by-Step Guide
Step 1: Define the Roles
The first step is to delineate the roles and capabilities of your AI agents. In the context of book writing, this means assigning responsibilities that play to each agent’s strengths1.
Step 2: Interaction Behavior
Next, you craft the dynamics of interaction between your agents. This collaborative dance is crucial, ensuring that each chapter not only stands alone but also contributes to the story’s overarching tapestry1.
Step 3: Installation and Code Integration
To bring your team to life, you start by installing AutoGen via pip install pyautogen. From there, you’ll integrate the framework into your environment, setting the stage for your AI agents to commence their collaboration.
Benefits and Capabilities
Using AutoGen agents means embracing a workflow that fluidly adapts to feedback and ambiguity. It supports collaboration, allowing each agent to contribute its expertise towards the collective goal of crafting a compelling narrative1.
Use Case: Writing a Book with AutoGen Agents
In the case of book writing, each agent — a Content Director, a Writer, and You — work in concert. Together, they form a creative ensemble, each playing their part in penning a story that could captivate readers the world over.
Now — Let’s Build it:
Setting Up the Environment
Block 1: Installing the AutoGen Library
Before diving into the assembly of our robotic writing team, it’s essential to set up our environment with the tools we need. The code below accomplishes just that by installing the pyautogen library, which is the cornerstone of our book-writing bots.
!pip install pyautogenThis simple line of code uses Python’s package manager pip to download and install the pyautogen package, giving us access to the functionalities necessary to interact with Microsoft's AutoGen service. With this library, we can create and manage our team of AI-powered agents, each with a specific role in the book-writing process.
Configuring the Agents
Block 2: Importing AutoGen and Setting Configurations
The next step is to bring the AutoGen library into our workspace and define the configurations for our agents. We do this as follows:
import autogen

config_list = autogen.config_list_from_json(
    "OAI_CONFIG_LIST",
    filter_dict={
        "model": ["gpt-4", "gpt-4-0314", "gpt4", "gpt-4-32k", "gpt-4-32k-0314", "gpt-4-32k-v0314"],
    },
)
Here, we’re loading the AutoGen library and using it to parse a configuration list from a JSON string or file. The filter_dict parameter ensures we only select configurations for the models we're interested in, which, in this case, are various iterations of the GPT-4 model.
Block 3: Defining the Configuration List Explicitly
config_list = [
    {
        'model': 'gpt-4',
        'api_key': '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',
    },
    {
        'model': 'gpt-4',
        'api_key': '<your Azure OpenAI API key here>',
        'api_base': '<your Azure OpenAI API base here>',
        'api_type': 'azure',
        'api_version': '2023-06-01-preview',
    },
    {
        'model': 'gpt-4-32k',
        'api_key': '<your Azure OpenAI API key here>',
        'api_base': '<your Azure OpenAI API base here>',
        'api_type': 'azure',
        'api_version': '2023-06-01-preview',
    },
]
In the third block, we’ve opted to define our configuration list explicitly in the code. This includes the model names and corresponding API keys required to authenticate with the AutoGen service. The placeholder text suggests where your actual API keys and other necessary information should be entered.
Assembling the Team
Block 4: Creating the Team Agents
With our environment ready and configurations set, it’s time to assemble our team of robot writers.
# Create a Content Director Agent
content_director = autogen.AssistantAgent(
name="content_director",
llm_config={
"seed": 42,
"config_list": config_list,
"temperature": 0,
}
)
# Create a Writer Agent
writer = autogen.AssistantAgent(
name="writer",
llm_config={
"seed": 42,
"config_list": config_list,
"temperature": 0,
}
)
# Create a User Proxy Agent to interact with the user
user_proxy = autogen.UserProxyAgent(
name="user_proxy",
human_input_mode="ALWAYS",
max_consecutive_auto_reply=10,
is_termination_msg=lambda x: x.get("content", "").rstrip().endswith("TERMINATE"),
code_execution_config={
"work_dir": "coding",
"use_docker": False,
}
)
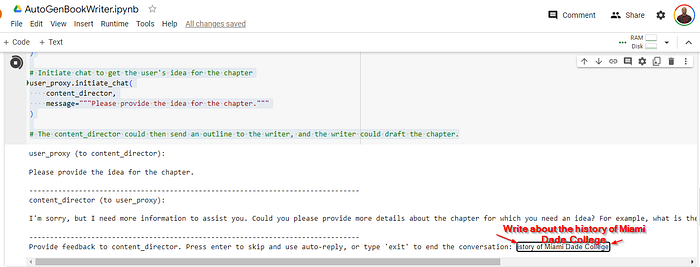
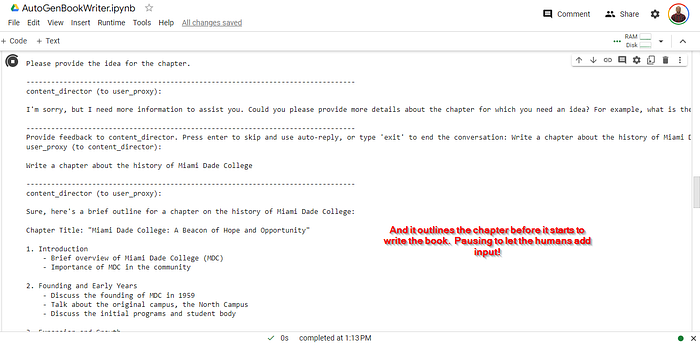
# Initiate chat to get the user's idea for the chapter
user_proxy.initiate_chat(
content_director,
message="""Please provide the idea for the chapter."""
)
# The content_director could then send an outline to the writer, and the writer could draft the chapter.In this block, we’re creating a Content Director Agent and a Writer Agent. These agents will handle different aspects of the writing process. The Content Director will oversee the creation of the content outline, while the Writer will flesh out the content into a full-fledged chapter. The User Proxy Agent is set up to interact with the user, take inputs, and use them to initiate the writing process.
Conclusion
The intersection of AI and human creativity is ripe with possibilities, and Microsoft’s AutoGen is the gateway to this uncharted territory. As storytellers, we are limited only by the breadth of our imagination, and with AutoGen, the horizons of narrative potential are ever-expanding. Embrace this journey, and let’s write the future, one AI-crafted sentence at a time.
If you’ve found inspiration in the idea of AI-assisted storytelling, let your applause echo in the digital corridors of Medium. Follow for more insights into the union of technology and creativity, and share your thoughts in the comments below. Your engagement is the ink in the quill of innovation. Let’s write, let’s create, and let’s revolutionize the art of storytelling together. 👏🏻✨📚1.